Build a form
Add, arrange and preview fields in the drag-and-drop builder, and know when your changes go live.
The Builder tab is where you design the form. It needs a larger screen, so on a phone you can read the questions but should edit on a desktop.
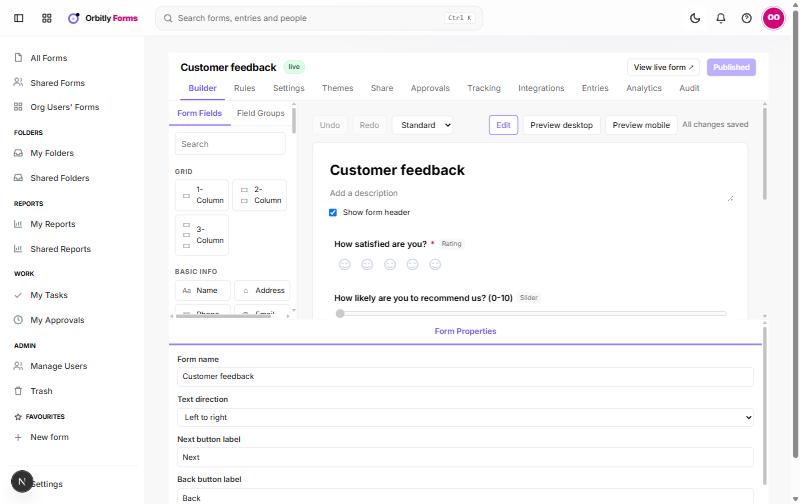
Add fields
- Open the form and go to Builder.
- On the left, Form Fields lists the field types in groups such as Grid, Basic Info, Textbox, Number, Choices, Date & Time, Uploads, Rating Scales, Legal & Consent, Page Elements and Advanced. Use the search box to find one.
- Drag a field onto the form to place it where you want, or click it to add it at the end. Drag a field already on the form to move it. Use Page Break to split a long form into pages.
- Select a field to change its label, whether it is mandatory and its other options.
- Select the form itself to change Form name, Text direction and the Next button label and Back button label.
Field Groups next to Form Fields holds ready-made sets of fields, which you drag or click to add in the same way. The 1-, 2- and 3-column grids place fields side by side.
Preview
Use Preview desktop and Preview mobile to see how it looks, and Edit to go back. Undo and Redo step through your changes. The type menu next to them shows the form type.
Saving and publishing
Changes save to a draft by themselves, and the toolbar shows All changes saved. A draft is not what visitors see. Choose Publish at the top right to make your changes live. After that the button reads Publish changes whenever there is something new, and the form header shows an unpublished changes badge.
Change the look
Open Themes to choose from Pre-built Themes, My Themes and Org Themes.
Next, add rules or publish and share the form.
Was this not what you needed? Contact support or search again.