Authenticate your sending domain
Set a sender on your own domain, publish SPF and DMARC records, and learn what DKIM and the return path involve.
Inboxes trust mail more when your domain proves it is really you. This is called authenticating the domain. You publish records at the company that hosts your domain's DNS. Orbitly does not change your DNS for you.
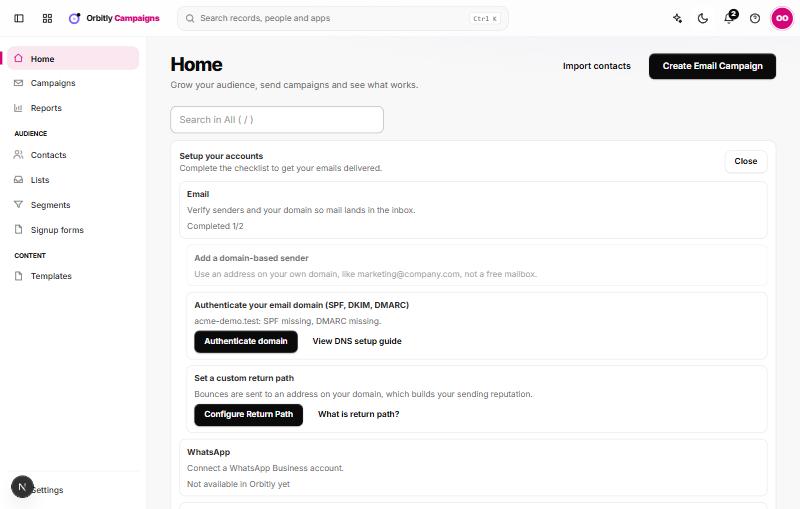
Set a sender on your own domain
- Open Settings and go to Senders, or choose Add Sender in the checklist on Home.
- Choose Add Sender and enter the From name, From email and optional Reply-to.
- Choose Save sender.
Use an address on your own domain, like a marketing address at your company. Addresses at free mailbox providers do not count as a domain-based sender. You can still override the sender on each campaign.
Publish the records
- On Home, open Setup your accounts, then Email, where Authenticate domain takes you to Settings, Senders. Or go to Settings, Senders, Domain authentication.
- Choose View DNS setup guide. It shows the records for your domain.
- Add them at your DNS host:
- SPF is a TXT record on your domain that lists the servers allowed to send for it. The guide shows v=spf1 include:YOUR_MAIL_PROVIDER ~all. Replace the placeholder with the value your mail provider gives you.
- DMARC is a TXT record on _dmarc. plus your domain. It tells inboxes what to do with mail that fails the checks.
- DKIM: your mail provider signs each message and gives you a key to publish. Ask them for the DKIM record for your domain.
- Wait for DNS to update, then choose Check domain again.
The page then shows SPF found or missing and DMARC found or missing. With both found, the sender shows Authenticated. Otherwise it shows At risk.
Configure the return path
The return path, also called the bounce address, is where a failure notice goes when an email cannot be delivered. It is separate from the From address. Using your own domain for it can help your sending reputation.
In Home, Setup your accounts, Email, choose Configure Return Path. It shows you to create a CNAME record named bounce. plus your domain that points to the bounce address your mail provider gives you, then ask them to use it. Orbitly does not check this record and the checklist does not tick it off. Until you do, bounces go to your mail provider's own address, which still works.
If mail still lands in spam
Check that the From email matches the authenticated domain, and read the tips on the Review step before you send. See Create and send an email campaign.
Was this not what you needed? Contact support or search again.